| پœcontent_filter‚ً—ک—p‚µ‚½‘—ژَگMƒپپ[ƒ‹‚جƒEƒCƒ‹ƒXƒXƒLƒƒƒ“ |
پ@Postfix‚جcontent_filter‚ً—ک—p‚µ‚½‘—ژَگMƒپپ[ƒ‹‚جƒEƒCƒ‹ƒXƒXƒLƒƒƒ“‚حپC‰؛‹L‚ج‚و‚¤‚ةپuconfigureپvژ‚ةپu--enable-smtpپv‚ئپu--enable-postfixپvƒIƒvƒVƒ‡ƒ“‚ً‰ء‚¦‚ؤƒCƒ“ƒXƒgپ[ƒ‹‚ًچs‚¤پiگ}2پjپBڈ‰ٹْگف’è‚جƒ|پ[ƒg‚ًپu10025پv‚©‚ç‚ظ‚©‚جƒ|پ[ƒg”شچ†‚ض•دچX‚µ‚½‚¢ڈêچ‡‚حپCپu--with-smtp-port=ƒ|پ[ƒg”شچ†پv‚إژw’è‚·‚éپBپuX-Virus-Scanned: by AMaViS perl-11پvƒwƒbƒ_‚ً•t‰ء‚µ‚½‚‚ب‚¢ڈêچ‡‚حپu--disable-x-headerپv‚ً‚آ‚¯‚éپB
گ}2پ،‘—ژَگMژ‚ةƒپپ[ƒ‹ƒXƒLƒƒƒ“‚·‚é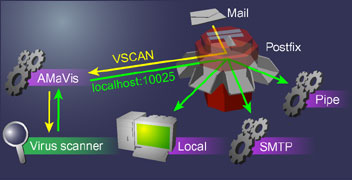 ‘—ژَگM‚³‚ê‚éƒپپ[ƒ‹‚جƒEƒCƒ‹ƒXƒXƒLƒƒƒ“‚ًچs‚¤‚½‚ك‚ةcontent_filter‚ً—ک—p‚·‚é |
|
$ wget http://www.amavis.org/dist/perl/amavis-perl-11.tar.gz پi’†—ھپj ** Configuration summary for amavis perl-11 2001-04-07: Install amavis as:/usr/sbin/amavis پ¦Configuration summary‚ًژQڈئ‚µپCEnable SMTP:‚ھyes‚إ‚ ‚邱‚ئ‚ًٹm”F‚·‚é To accept the above, type "make" PASS: config $ su |
پ@ƒEƒCƒ‹ƒXƒXƒLƒƒƒ“‚ج‚½‚ك‚جƒfƒBƒŒƒNƒgƒٹگف’è‚ًچs‚¤پBپu/varپv‚ة‚ ‚éamavis‚¨‚و‚رvirusmails‚جڈٹ—Lƒ†پ[ƒUپ[پCƒOƒ‹پ[ƒv‚ًvscan‚ئ‚µپCƒpپ[ƒ~ƒbƒVƒ‡ƒ“‚ًٹm”F‚µ‚ؤ‚¨‚پB
| # cd /var # chown -R vscan.vscan amavis virusmails # chmod 700 amavis virusmails |
پ@ژں‚ةپu/etc/postfix/پv‚ة‚ ‚éPostfix‚جگف’èƒtƒ@ƒCƒ‹main.cf‚ئmaster.cf ‚ج•زڈW‚ًچs‚¤پBvi‚ً‹N“®‚µ‚ؤپCmain.cf‚ة‚ح
| content_filter = vscan: |
master.cf‚ة‚ح
| vscanunix- n n - 10 pipe user=vscan argv=/usr/sbin/amavis ${sender} ${recipient} localhost:10025 inetn-n--smtpd -o content_filter= |
‚ً‚»‚ꂼ‚ê’ا‰ء‚µ‚ؤ•غ‘¶‚·‚éپB‚»‚µ‚ؤ
| # /usr/postfix/bin/postfix reload |
‚ئ‚µپCPostfix‚ًچؤ‹N“®‚³‚¹‚ؤ•دچX‚ً”½‰f‚³‚¹‚ê‚خپC‘—ژَگMƒپپ[ƒ‹‚جƒEƒCƒ‹ƒXƒXƒLƒƒƒ“‚ھ‰آ”\‚ة‚ب‚éپB
| 4/5 |