時間感覚を養うプログラミングとは?――事例で知るガジェット:Windows Liveが魅せる次世代マッシュアップ(2/4 ページ)
この記事は、既存のガジェットの改造や、新規アイデアによる開発を行うためのガイドをするのが目的である。従って、開発方法の細部は触れないが、その詳細について知りたい場合には本特集の過去記事を参考にしてほしい(関連記事)。
Liveガジェットは、以下の3つのファイルから成り立っている。ガジェット全体を定義するXMLファイルである「ガジェットマニフェスト」、ガジェットの事実上の本体プログラム「ガジェットスクリプト」、ガジェットの外観を定義する「ガジェットスタイルシート」の3ファイルである。
今回紹介する「時間感覚・TimeSense」は、これまで事例紹介してきた実用的なLiveガジェットとは毛色が異なるが、同じく脳トレLiveガジェットの「ブレイントレーニング」同様、例外ではない。「TimeSense.xml」「TimeSense.js」「TimeSense.css」の3ファイルから構成されたガジェットである。
「時間感覚・TimeSense」のマニフェストファイル「TimeSense.xml」(リスト1)を見る前に、まずはこのLiveガジェットの主な動作を頭に入れておこう。
 まずプルダウンから秒数を選択する。10秒から60秒まで、10秒ごとに選べるが、まずは10秒からチャレンジしてみよう
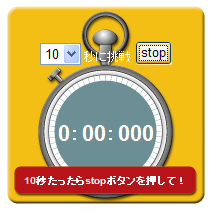 「start」ボタンをクリックした時点から計測開始。自分が指定した時間が来たと思ったら、「stop」ボタンをすかさずクリックする
 隠されていた実際の時間が表示されて、結果に応じたコメントが表示される
リスト1■マニフェストファイル「TimeSense.xml」
<?xml version="1.0"  encoding="UTF-8"?>
<rss version="2.0" xmlns:binding="http://www.live.com">
  <channel>
    <!-- Specifies the name of your Gadget -->
    <title>TimeSense</title>
    <link>http://est.jp</link>
    <!-- Gives a short description of your Gadget -->
    <description>Please try sence of time.</description>
    <!-- Specifies the default locale for your gadget -->
    <language>ja-jp</language>
    <!-- Specifies the JavaScript object that defines your Gadget (this object must be defined in the jscript linked to below) -->
    <binding:type>East.Gadget.TimeSense</binding:type>
    <item>
      <!-- Specifies the JavaScript file that contains the code for your Gadget -->
      <link>TimeSense.js</link>
    </item>
    <item>
      <!-- Specifies the css file that contains the styles for your Gadget -->
      <link binding:type="css">TimeSense.css</link>
    </item>
    <icons>
      <!-- Specifies a .png file to be used as the icon in the title bar for your gadget -->
      <!-- <icon height="32" width="32">http://localhost/Gadgets/TimeSense/TimeSense.png</icon> -->
    </icons>
  </channel>
</rss>
マニフェストファイルには、Liveガジェットの名前と説明、実際に使用するスクリプトとスタイルシート指定が定義されている。つまり、新しくLiveガジェットの開発をする際には、要所を書き換えることで、一からマニフェストファイルを書き起こさなくてもよいのだ。このマニフェストファイル自体が、応用可能なテンプレートとして利用することができるはずだ。
それでは続いて、プログラム本体である「TimeSense.js」を見ていこう。
Copyright © ITmedia, Inc. All Rights Reserved.
アイティメディアからのお知らせ
注目のテーマ

人気記事ランキング
- KDDIの最大1422万件の情報漏えい事件 その裏には陸自USB問題と同様に中国の影?
- 北陸電力は紙と手入力をどう“捨てた”? 年間で3万時間削減
- AIはITエンジニアを淘汰しない Microsoft調査が示す、AI委任とキャリアの好機
- たった1件の不備でマイナス1万点 AIの物量攻撃に耐える“基礎の強度”
- AWSの「静かな」戦略シフト OpenAIとAnthropic“1日違い登壇”の意味を読み解く
- 開発者が突然「2026年はあの定番データベースをやめろ」と言い出した理由とは? 愛された技術の裏事情
- Google Chromeで「Perplexity」を偽装する悪質拡張機能が発見 Microsoftが警告
- FDEとリコーの新コンサルサービス、どこが違う? AXのパートナー選びを考察
- 「Claude Mythos」が突きつける、IT業界の転換点 われわれが置かれている状況を「姉歯事件」から読み解く
- メインフレーム離脱プロジェクトの7割超が失敗、理由は「生成AIの過大評価」
![]() ITmediaはアイティメディア株式会社の登録商標です。
ITmediaはアイティメディア株式会社の登録商標です。